Tuesday, November 24, 2020

Magic circle or ring

 The magic circle (as I like to call it) a.k.a the magic ring and probably other names as well. 

In my opinion is one of the most essential keys to Amigurumi. Having the beginning of a piece looking its best, makes all the difference. 

Seeing stuffing is probably the worst in my book but messy beginnings are a close second. 

The goal is to have your end result like this...

Not this...


Maybe your thinking, I don't see much of a difference. 

Lets put them side by side and see if you see it now. 


As you can see the center of the magic circle is completely closed vs the ch 2 method has a center hole. For me, no matter how many times I try, ch 2 always leads to a center hole. Drives me nuts!! 

It is time to learn the magic circle!!

Let's begin...

Holding the yarn tail over the fingers and into the palm of your hand, pinch it to your index finger with thumb.


Wrap the working yarn over the middle and index finger, crossing over the yarn tail, pinch it in place on index finger with thumb.

Secure running yarn behind loop on fingers.

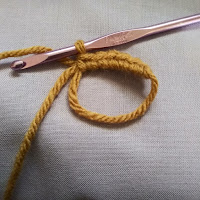
Insert hook under loop and pull the working yarn through.

Give it a little twist to have a snug fit on your hook.

hook your working yarn and pull through the loop on hook.

And look at that, your done!

There that wasn't so bad, was it? Okay maybe trying a few more times might be needed.
Now you are ready to start your stitches.

Create your stitches around both tail and loop, 

When you have reached your desired amount of stitches, move the tail out from inside the loop.

Grab the tail and pull until the hole is closed. 
Most (I have noticed) stop right there BUT I have found that when working the next round the center will become loose a bit. 
Well with amigurumi, that just wont do.


After completing round 2, grab the tail and pull it snug again and this time put 3 knots on it as close to the work as possible. 
How I do that is by laying the piece flat, making a loose knot and holding my finger over it while pulling, this lays the knot right at the starting point of the tail, then I repeat 2 more times. The reason I do 3 is to make the knot larger that the stitches so no way is it going to work through and loosen.

And there you have it, a nice magic circle with no hole and secured to not come loose.

I hope this picture tutorial was helpful AND if at first you don't succeed, try, try again.

Happy crocheting!


Friday, November 20, 2020

Southern Gal's Crochet beginnings...


So if you missed the first part... Leading up to Southern Gal's Crochet.

Welcome to the beginning of Southern Gal's Crochet.

I left off with falling in love with making Amigurumi. This lead to exploring as many patterns as I could get my hands on and quickly realizing patterns are written in various different ways, each designer had their own style just like crocheters. I was learning heaps and had boxes filled with finished products. 

With all these finished products hanging around I needed to do something with them. So I opened a Etsy shop. The first thing they ask for is a shop name, I had no clue what name to be. That was torture for me, my family and friends, eventually it was decided Southern Gal's Crochet was good. 

Selling my finished items and making custom orders went well but I knew it wasn't where my heart was at, I knew I wanted to write patterns for all the ideas I had floating in my head. 

I wrote my first pattern in 2011, I was thrilled with myself. LOL! I laugh cause I was so naive. I had no clue about the legal stuff, protecting your work and making a quality pattern. Heck I didn't even know that you were supposed to get those patterns tested before publishing. 

Yes. Yes I did! I really released a pattern untested and with zero step photos. I hang my head in shame. I soon realized I had made a mistake when I started getting mean messages from customers unhappy with the quality of pattern they purchased. I look back and I don't blame them at all, today I would totally do the same thing, maybe not as mean.

I worked hard at making my patterns better and with a little more style. Slowly building it up one pattern at a time, in just a few years I had a about a dozen patterns. It probably would've been more but I was still taking orders from family and friends. 

One day in 2018 I decided that was it, no more orders, I was going to switch over to just patterns. 

I am glad I did. It freed my creative mind to flow, the pattern ideas were coming at me faster than I could make them. My testers were so busy I had 2 or 3 patterns being tested at once, it was crazy!

Thankfully I got control of my mania and settled into a nice groove. I still get lots of ideas and jot them down but I am not frantically trying to do them all at once anymore. At this slower pace, even if I wasn't to get another idea, I would still have enough to last a few more years. Haha.

I hoped you enjoyed getting to know me a little better and of how it all began is still going.

Happy Crocheting!
Heather Welch

Friday, November 13, 2020

Leading up to Southern Gal's Crochet...


I have always (or so it seems) known how to crochet. Haha, okay not really but I have been surrounded by it from various family members and friends growing up. 

My earliest memory of yarn was when I was about 6, my Nana knitting and my Grammy crocheting. I remember watching them but never asking anything about it.

When my father remarried when I was 7, my step mother (mom) brought yarn into my life, she was a crocheter. I just recently recalled my first toy with her and it was an octopus. Green and blue yarn wrapped around a Styrofoam ball, the legs were braids and the eyes were made with red felt. I was so proud of that thing! LOL!

When I was 8 or 9, I went to camp and learned how to make a chain on my fingers. The Christmas tree that year had lots of chains on it. Hey, my mom had to find something to do with all my practice work!

We had a friend of the family that babysat us occasionally and she decided I needed to move to the next level and taught me how to crochet a single crochet stitch blanket for my Barbie. Well lets just say Barbie got a triangle blanket but a blanket none the less. I eventually taught myself how to quit loosing stitches and also how to do a double crochet (not know that was what it was called).

After picking up crochet for a blanket or scarf now and again through out the years, life had a way of always bringing me back to crochet. Whether it be passing the time while 18 wheeling back and forth across the country or coming home and having nothing to do, so I pick up the hook once again.

Many blankets and scarves were made over the decades.

Till one day shortly after getting my very first computer in April 2008, I decided to check out the website on the label of the Red Heart skein I had. To my surprise they had patterns!, I was in awe, but sadly I had never learned to read a pattern. After picking a blanket design and saving every chart I could find, I took on the task of figuring it out. I remember calling my best friend to share with her my exciting achievement.

After many patterns, failures and frustrated tears, by 2011 I was feeling brave enough to try a toy. I saw this book in the craft store called Sugar'n Cream Bright Ideas and it had a set of monsters in it. I just had to try them!


The original pattern called for felt for the face pieces, I didn't any so I had to figure out how to make the faces in crochet, which pushed my brain to be creative.

I fell in love with making Amigurumi!

It was a love that drove my creativity to blossom.

To be continued...


Thursday, November 5, 2020

Frog, frogging and using frogged yarn


The title is making me laugh, it feels like I am doing a tongue twister! 

Kidding aside, let's get to it.

What is frog or frogging in the crochet world? Frog or frogging comes from the phrase "rip it" "rip it".

Say that fast enough or with an accent and "Rip it" can sound like "Ribbit" like a frog.

Where does "rip it" fit in to crochet? Generally when mistakes are made you will need to undo the stitches back to where the mistake is.

If it is a large amount, you grab the yarn and just start ripping (a.k.a frogging) them out.

If asking your fellow crocheters what to do about a mistake rounds or rows back, the typical answer will be to "rip it" or frog it.

Now that you know what frog and frogging are and how they apply to crochet, we will talk about the yarn that you just frogged.

Most crocheters will do everything they can not to waste yarn as it can be quite expensive depending on location or preference.

They will frog out the yarn, fix the mistake and continue on using the same yarn they just frogged.

I do not.

I will do my best to explain why.

But let me clarify that I also do not use expensive yarn.

Almost all of my patterns are done using yarns in either Red Heart super saver or Bernat super value.

These are acrylic yarns that are common in the USA and Canada.

For Amigurumi I choose these yarns for their hold, durability and value of course.

But (there is always a but...) I do find that these yarns don't stay the same after frogging, I couldn't say whether other yarns do this as well but I am assuming probably.

As you can see in the picture below, that there are certain points in the frogged yarn that have been compressed, smooshed or stretched.

I like to use the word compressed.


Say I do the first 5 rnds of a head with my trusty G (4.00mm)hook, my gauge is going to be 5 sts and 5 rnds is 1 inch square.


But if I do this with frogged yarn, my gauge turns into 7/8 of an inch square


So there is an obvious difference. 


If I am just going to frog a few stitches or even just one round, I will use the same frogged yarn cause the difference wont hurt the project overall. 

If I need to frog a good portion of the work, I will cut the yarn and attach fresh yarn. 

Now keep in mind attaching new yarn works very well with amigurumi but not so much with other crocheted items. 


Most of the crocheters I have talked to about this subject hadn't noticed the difference until they tried it themselves. I encourage you to give it a try and see if your crochet style ends up with a difference. Some projects this will matter and some it wont, it is all up to your personal preference and crochet style. 


Hope this was informative and helpful, happy crocheting!